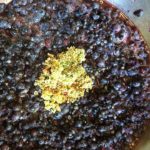
Blueberry Elderflower Jam
Jam and Granola are both sanctioned candy. Unless you’re making a refrigerator jam, cutting down the amount of sugar in your recipe will drastically reduce the shelf life of your preserves (and their safety).
Print Recipe
Pin Recipe
Ingredients
- 2 lbs Blueberries 920g
- 1 1/2 lbs Sugar 300g
- 5 oz Fresh lemon juice 140g
- 1 tbsp Fresh elderflowers 8g, or orange blossoms optional
Instructions
- Place your jars (just the glass part; your new lids should stay face-up on a clean surface) on a cookie sheet lined with a kitchen towel. Put this cookie sheet in a 200 degree oven, turn the heat off and leave until the jam is set. Take your tallest pot- it should be at least 3” taller than your jars- and fill it ¾ of the way with water. Bring this to a simmer, covered. Have a ¼ cup measuring cup ready by dipping it in the simmering water to sanitize it.
- Place rinsed blueberries, sugar and lemon juice in a large, nonreactive pot (that means no aluminum or cast iron that isn’t enameled). Here’s where you choose your adventure! You can cover the pot and let is sit overnight to start macerating* or place it on the stove right away.If you’re going to add Elderflowers, Orange Blossoms or anything else to infuse your jam, place these in an empty tea bag or a pouch you make out of cheesecloth or floursack towel and twine. Bury this either while the fruit macerates overnight or while you’re cooking it down.
*Why would you leave the jam to sit overnight before cooking it?
- Cooking the fruit is done in part with the heat and agitation from the stove, but the sugar and lemon juice play an important part, too. The sugar and lemon are going to start cooking the fruit by drawing the water out of it. By letting this maceration take place in the fridge for 3-12 hours, you’re reducing the total amount of time it will take to cook the fruit over the stove. It’s also the best way to infuse your jam with flowers, spices, etc.
- Cook the jam over medium heat, stirring occasionally. If you stir too much at the start of the cooking process, you’ll end up with more broken-up fruit rather than large pieces. If that’s what you’re going for- then go for it with the wooden spoon!
- Once the mixture begins to reduce a little bit, (you will notice that the level of jam shrinks down the pot as is cooks), begin stirring. When stirring, use a wooden spoon and scrape the bottom and sides as you go around. When the mixture begins to bubble, be sure to turn the heat down and continue stirring frequently.
- You can occupy your time by starting to skim the foam off the top with a clean spoon. It won’t make your jam anything but clearer. But it passes the time.
- Let’s test the jam! Have a few metal spoons nearby. Pick up a spoonful of jam and turn the spoon so it is horizontal. If the jam is so thick that is nearly won’t come off the spoon (there should be a pregnant pause here, a drop so thick and viscous it won’t drop off the spoon), you’re then ready to jar it.
- . Take the jars out of your oven. Let them cool for a few minutes. Using the measuring cup (and a sanitized funnel, if you have one), fill the jars with the hot jam just until the jam hits the middle line of the top of the jar. Take a look at your jar: twist until you see all three lines near the top- the middle line is the perfect place to stop filling. Too little jam and you’ll give bacteria a nice amount of oxygen to thrive, and too much jam can cause it to spill over the seal and ruin the processing.
- Immediately place the lids on the jars and twist them fingertip-tight. Using a pair of tongues, carefully lower these in your pot of water. There should be at least 2” of water above the lids of the jars. Turn the heat up, and count 10 minutes from the time it begins to boil (20 minutes if you live at high altitude).
- Remove the jars from the pot and place them back on the towel-lined cookie sheet. Once cooled, you can gently wipe the water off the lids. Store them in your cupboard for up to 6 months. Once opened, these will last a week or two in the fridge.
Notes
This recipe can’t be doubled in a 10-12” wide pot. Why? Because jam is made by reducing the amount of water in the fruit in order to prevent bacteria (which loves to grow in moisture) from growing. In order to let moisture evaporate during the cooking process, you need a lot of surface area exposed. If your pan is too full of jamming liquid, the jam will overcook before it thickens and sets.
This recipe will yield you 5 eight ounce jars. Check out our 5 Steps of Canning before you start.
5 Steps to Easy Canning and Preserving Fruit
- Wash and cut fruit.
- Sanitize jars (leave lids face up on a clean surface).
- Cook fruit until it sets.
- Fill warm jars with hot jam.
- Close the jars and process them in a water bath.