I am not a careful baker, so when you’ve asked us for our signature Spelt Sourdough recipe, I’ve tended to lend you our copy of Ken Forkish’s awesome bread book Flour, Water, Salt and Yeast or guided you towards our Rustic Breads class. My baking routine is really just a timeline; I feed the starter 12 hours before starting the process, then mix a little of the active starter with flour and water to make a levain, wait about 7 hours and mix that with more water, flour and salt and mix intermittently for a couple of hours. This dough rises really, really slowly, developing strength and flavor, while we all sleep, and the next morning I’ll grab our bannetton and shape the bread. These loaves proof during the morning class and get slashed and baked in a super hot oven while we prep for the night classes. The amount of salt and levain are always the same, but I tool around with the amount of water depending on how much whole grain flour I choose to work with.
The art of knowing what to do takes time to develop and an understand of how bread works, but so does hearing out other peoples’ most commonly asked questions (aka, those you may have been to shy to ask). Here goes!
WHAT IS A STARTER? Yeast is a collection of spores and live on every surface imaginable. Yeast can be collected and trained or cultivated in specific strands in a sterile and controlled environment. Commercial yeast is grown in a lab and is super consistent, activates almost immediately and grows very quickly. Wild yeast, natural yeast or sourdough starter (all different names for the same thing) are encouraged to gather and multiply in wherever you decide to grow them. If you’re going to make your own starter, try this:
- Mix water and all purpose flour in a bowl to make a paste. Let it sit for three days uncovered (best to put it up where you can’t see it, because it’s going to get nasty).
- Take it down from the shelf and scrape off the dry gunk that formed (it’s cool, it kept the gnats away) and grab a spoonful of the clean stuff in the middle.
- Put the little spoonful of clean fermented culture in a glass jar and feed it: 25g whole wheat flour, 100g all purpose flour, 25g whole wheat flour and 100g water. Mix and repeat every 12 hours for a couple days, throwing half of the contents out each time before feeding. You’ll notice the starter moving up after a feeding, then collapsing. It’s now got a metabolism! Good job!
I KILLED MY STARTER. This is typically a statement rather than a questions, and most often you you’ll be surprised to know that you haven’t killed your starter so much as neglected it. As your yeast eats and expels carbon dioxide, it begins to break down the sugars in your flour and slowly ferment them into alcohol. Your starter will start off with a good sweet tang and slowly smell more like vinegar, intensifying as its hunger grows. Slow it down, refresh the spores that still live on and feed (see below). You haven’t killed your starter unless it smells like rotten eggs!
MY STARTER GREW A WEIRD BLACK LIQUID AND I THREW IT OUT. Relax Heather, you were headed towards moonshine. Your starter was fermenting reallly slowly in its hibernation station. To revive the starter just pour the liquid off, throw half the starter out and feed it (see below). It’s always safer to store the starter in the fridge with a large skulls and bones and warning sign not to throw away (in case a well meaning visiting mom decides to toss anything suspect out of your fridge).
WHAT DO I FEED THE BEAST? I use this formula to feed my starter. Get a scale, they cost the same as three cups of coffee. For every 25g of starter, give it 100g water, 75g all purpose flour and 50g whole wheat flour. Save the gorgeous stone ground flour your ordered from here, here or here for your dough and feed the starter with whatever decent unbleached flour your can get your hands on. If you bake bread more than once a week, keep your starter out and feed it every day. If not, store it in the fridge and wake it up with a feeding at least 6 hours before starting your bread making.
HOW LONG SHOULD I WAIT AFTER TAKING THE STARTER OUT OF THE FRIDGE BEFORE FEEDING? Thanks for asking, Kevin. Your starter should be fed right out of the fridge (helps things out to have the water be a tad on the warm side). Wait a good 6 hours, then test the starter by spooning a bit into a glass filled with water. If it floats, you’re all set. If not, wait a bit longer or do a second feeding and wait 6-12 more hours.
DOES SOURDOUGH BREAD HAVE TO BE SOUR? Such a great question, Nance. It doesn’t, and in fact, in many places a sour bread is considered defective. San Francisco is known for its puckery loaves, but most great long-fermented breads have a distinctive sweet tang, much like a good plain yogurt.
CAN I JUST SUB OUT ALL OF THE ALL PURPOSE FLOUR IN YOUR RECIPE WITH WHOLE GRAIN FLOUR? I love your enthusiasm for whole grains, Monique, but not really. Bread recipes are designed with ratios of water to yeast to flour, so it’s best to go with a recipe designed to be closer to 100% whole grains. I would consult a variety of awesome books for other recipes (or email us for a few), such as Josey Baker Bread, Tartine Bread or one of my new favorites, Sarah Owen’s Sourdough book.
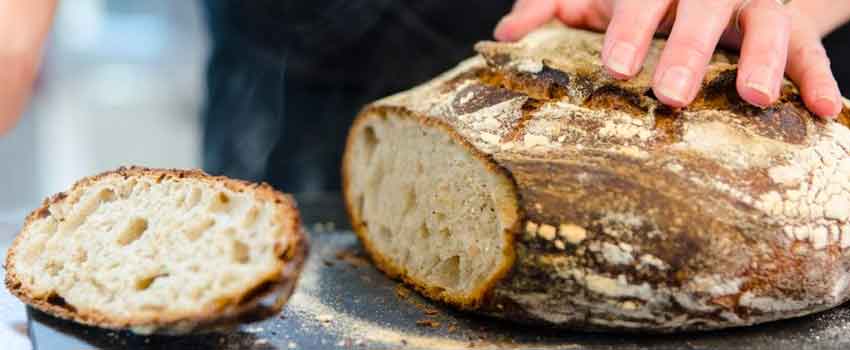
I WANT A HOLIER BREAD. Frances, you read our minds. Most bread enthusiasts are after the trinity; a tall, custardy loaf studded with airy holes, a thin, crisp crust and the ear, that sharp shelf that juts out of the bread. In order to achieve this level of success, you’ll need a strong flour (strong gluten strands from a tough flour will be able to expand as they capture steam from the water in the dough better than weak ones), a long fermentation period (for that dark, bubbly crust) and really hot oven coupled with lots of water in the dough (to encourage a sudden burst of steam, busting through the bread walls to create an ear).
WHAT DOES HYDRATION MEAN? It’s the ratio of water to flour in your recipe. Don’t overthink this. Just know that wetter doughs create more steam in the oven, which means more holes. Recipes with more whole grain flour have more water-sucking bran in them and require more water than a recipe with only all purpose flour.
WHAT IS HIGH-EXTRACTION WHEAT? Hi Grant! If you take wheat berries and grind them into flour, you’ve got yourself a 100% stone ground whole grain product. Other than the rare small mills, most whole wheat flours have a substantial amount of bran removed from the product (this helps with shelf life stabilization, among other things). As you sift out (try this at home! grab a cup of whole wheat flour and tap it through a fine mesh sifter- the starchy endosperm will fall into your bowl as all purpose flour and leave the bran in the sifter) the bran, you’re creating extractions. A high-extraction flour is one with most of the bran and germ left in the flower, a low-extraction flour is one with less bran and germ present (and to be clear- it’s nearly impossible to find any commercial flours with germ left in them).
WHAT DOES BIEN CUIT MEAN? The French abhor anemic breads, and with good reason. Caramelization and darkening of foods produces a release of flavor compounds not found in pale foods. Bake your bread until nearly burnt. You’ll thank us.
I STINK AT SHAPING. HELP ME. Roger, that’s not a problem. When frustrated with shaping, just line a cookie sheet with parchment paper and brush on some olive oil. Dump your dough over the oil. Pour oil in your hands and pretend like you’re really mad at your piano keys. Let this proof for 2 hours. Bang the keys some more and add some rosemary. Bake in a 425F oven and get your Focaccia on.
I WATCHED THE GREAT BRITISH BAKEOFF AND I WANT A PROOFING DRAWER. Darling, the sets for this show are outside, in a tent, in Northern England. Their hottest heat wave wouldn’t be warm enough to let bread rise. If you live anywhere near our cooking school, the only proofing cabinet you need is any place in your kitchen that isn’t the fridge. Yeast gets happy when its warm and humid.
WHY DO ALL SOURDOUGH RECIPES HAVE SO MANY STEPS? All your bread baking books are going to follow the same steps, but they’ll vary in time, temperature and ingredients based on how long the bread needs to ferment. I find it easy to look at bread making in 6 simple steps; all of your sourdough bread books will call for these, even if each steps is called something different from author to author:
- MIX LEVAIN. You will combine a little bit of active starter (it should have been fed 6-12 hours before) with some water and flour. This mixture will sit around at room temperature for a few hours. Consider this the super-feeding-wake-up-call for your yeast (the starter) to get workin’. There are many words that may be used in place of levain, such as poolish, biga, sponge, leaven and pre-ferment.
- MIX THE DOUGH. This is sometimes broken down into two steps:
- AUTOLYSE. This very simply means that you’ll be stirring the water and flour for your dough and letting them sit for a few minutes or a few hours to hydrate.
- ADD THE LEVAIN AND SALT. You’ll pinch, knead or mix in the levain and salt into the flour and water mixture until they are homogenous.
- STRETCH & FOLD. Kneading is tough with these often very wet doughs, so bakers keep the dough in a large bowl or tub and stretch each side out, slapping the dough down onto itself and repeating all the way around. You will notice that the dough begins to gain strength as you stretch and fold, and once it starts to resist getting stretched up and out, you can set it aside for 30 minutes. I use a wet hand before digging in, believe it or not; it keeps them from getting super sticky. Most recipes will have you stretch and fold the dough 3 or 4 times over an 1-1/2 to 2 hours.
- BULK RISE. Once you’ve given your dough a few good stretches and folds over a couple of hours, you get to choose your own adventure. Some bakers let the dough bulk rise in the fridge for a day or two, some just leave it out overnight. It all depends on how much flavor you want to develop and how much starter was added to your levain in the beginning.
- SHAPE & PROOF. Shaping bread is all about letting go. All you want to do is make sure that you flour your work surface just a tad, dump out your slack, lazy dough and gather the dough in a series of tucking-under motions to create a nice, taught ball (boule). The less you handle the dough the better, because over-handling it to get a perfect result will result in a flat bread that’s had all the gassy wind blown out of it. As you improve your shaping skills, practice using less and less flour each time. If you don’t have the round, cane bowls called banneton to proof your bread in, line a deep, narrow bowl with a cotton towel (like a flour sack one or a clean cotton shirt) with rice flour (all purpose will do a in pinch) and invert your dough into it.
- SLASH & BAKE. Before you get to baking, you need to cut into some of the dough just before taking it to the oven. I think scissors make for the easiest, cleanest results- try cutting three large V-shaped cuts into the top of your bread and pop it right into your hot vessel.
THE GOURMANDISE SIGNATURE SPELT BREAD
Ingredients
Levain
| 25g | Starter * | |
| 100g | Water, at room temperature | |
| 75g | All purpose flour | |
| 50g | Whole wheat flour |
Directions
- Mix the starter, water and flours together and leave, covered, on a counter for 6 HOURS.
*Your starter is active and ready to use if it floats in a cup of water. This levain recipe is the same amounts I use to feed our starter.
Dough
| 500g | All purpose flour | |
| 400g | Whole grain Spelt flour | |
| 700g | Water, at room temperature | |
| 25g | Sea salt | |
| of your Levain |
- Get a jar or cup large enough to hold your hand, fill it with water and put it near your work station. Place the water and flours together in a large bowl or tub and, with a wet hand, mix just until the flours absorb the water. Dump the levain and salt over the dough and let it sit, covered, for 30 MINUTES.
- Wet your hand and mix the levain and salt into the dough. This process will take about 5 minutes to incorporate well and can happen in a stand mixer fitted with a dough hook. Once incorporated, cover the dough and let is sit at room temperature, covered for 30 MINUTES.
- It’s time to knead! This wet dough is too knead traditionally, so we strengthen the dough with stretches and folds. Grab your dough from underneath with a wet hand and stretch it out to the side of the bowl, then slap it down over the other side of the dough. The dough may tear at the start, but as you turn the bowl a quarter turn and repeat several times, you’ll notice it strengthening as your stretch it out. Repeat the stretch and folds, turning the bowl a quarter turn after each stretch, for about 8 turns. Let the dough sit, uncovered, for 30 MINUTES.
- Repeat the stretch and folds and let the dough sit, uncovered, for 30 MINUTES.
- Repeat the stretch and folds and let the dough sit, uncovered, for 30 MINUTES.
- Now it’s time for the bulk rise. You can go to work or go to bed, because the dough will slowly, verrrry slowly, expand to nearly three times its size at room temperature for about 8 hours (a little more like 10 if it’s cold out). Let the dough sit in a tub at least double its size, covered, for 8 HOURS.
- Let’s get ready to shape! Grab two bowls lined with flour sack or thin linen towels or two of those pretty cane banneton (for a pretty spiral effect) and dust them liberally with white rice flour (preferred) or all purpose flour. If you’re using bowls, be sure to use bowls that are narrow and deep rather than wide and shallow in order to encourage your bread to rise up instead of out.
- Lightly flour your work surface and dump the dough onto it. Divide the dough in half. You are now going to turn your blobs of slack dough into nice, taught rounds. Fold the sides of the dough over themselves (a little like what you were doing with the stretch and folds) like a package. Flip the dough onto your surface so those seams face down and tuck and roll the bottom of the dough, traveling the bottom of the dough across your work surface to make it nice and taught. If you used too much flour, the dough will slide back and forth instead of grabbing onto the table, helping the sides to gather and get taught.
- Repeat with the other dough and flip your doughs seam-side up into your flours bowls or banneton. Cut two piece of parchment paper rectangles the size of a regular cookie sheet. Dust the top of your dough and place the parchment over it. Proof your bread for 3 hours.
- While the dough is proofing, get your oven ready. You can bake your bread in a Dutch oven, large cast iron skillet with a metal bowl that fits snugly over it or a pizza stone. Place any of these items in your oven and turn it on to 425 about 30 minutes before you plan on baking. You will be baking one loaf at a time unless you have two Dutch ovens or a very large pizza stone.
- Remove your Dutch oven or cast iron skillet from the oven and take the lid off. Place a plate over the parchment paper and flip the dough onto the plate. Pick up the sides of the parchment and drop the dough into the Dutch oven or skillet, immediately placing the cover back on and putting them into the oven at 425F. Bake for 30 minutes, then remove the lid and finish baking until a lovely dark brown color shows. Remove the pan from the oven, then to bread and repeat with the second loaf.
- If you are baking on a pizza stone, flip the dough onto a plate and slide the parchment paper with the dough on it directly onto the stone. Close the oven door and bake until the bread looks nearly burnt.