Hey! You! Relax! It’s time to jam.
Turn on the tunes, clear your calendar and your counter for a couple of hours; we’re going to make some sweet, sweet preserves together. Forget everything you’ve seen on YouTube or read in a seasonal magazine. You’re about to make fantastic seasonal fruit spreads with less sugar than your bottle of sweet tea, no pectin, less work than you thought and, in exchange, you’ll have a shelf-stable pairing for your homemade bread.
Let’s get started.
First off, we’re going to break jam making down into 5 simple steps.
1. Wash and cut fruit. When washing delicate fruits like raspberries and strawberries, fill a bowl with cold water and slosh the berries about instead of crushing them with the faucet’s gushing water.
2. Sanitize jars. (leave lids face up on a clean surface). We prefer sanitizing jars in the oven. It leaves valuable stove space available for jamming and prevents water from collecting in the jars. Place a dish towel on a cookie sheet and preheat the oven to 250. Take the lids off the jars (set them aside upside down) and place them in the hot oven until you’re ready to fill them.
3. Cook fruit until it sets. We start with the heat on medium high and stir occasionally until the jam begins to reduce and thicken. I love jam with thick pieces of fruit, but if you like a smoother one, then stir to your heart’s content (the more you stir, the more the fruit breaks down). Keep turning the heat down until the jam sets*.
4. Fill warm jars with hot jam. Remove your jars from the oven. Set the cookie sheet on a towel (to keep your counter from burning). Place a funnel over the top of your jars, or chance it and use a 1/4 cup measuring cup to fill the jars. You’ll want to fill the jars just to the middle spiral; if you turn the jars just so, you’ll notice three lines- the middle one is where you want to end. Too little jam and you increase the oxygen in your jar, too much and the jam can spill over and break the seal.
5. Close the jars and process them in a water bath. Wipe the top of the glass jar if you spilled some on the side (it’s all about the seal) and twist the lid onto the jar. Get your tallest pot going by filling it with water and bringing it to a boil. Lower your jars in (it’s helpful to have rubber tongs or grabbers) without tilting them into the water. You need at least 2″ of water above the top of the lids, and once the water returns to a boil, leave them in, boiling for at least 10 minutes (20 if you’re at high altitude). Remove the jars from the water without tilting and wait for the sweet sounds of popping lids. Done! Your jam, should they remain closed, will be good for 6 months in the pantry.
Q: Great. Now will you give us some recipes?
A: Possibly. You don’t need a recipe so much as this chart and our lovely tips below. You’ll be fine. If you’re not, call the Hotline (310.656.8800).
JAM RATIO CHART
We love this handy chart- it requires a scale, but you can pick those up for next to nothin’ or borrow one from a friend.
FRUIT LBS. SUGAR LEMON JUICE
Strawberries 2 lbs. 1.25 lbs. 3.5 ounces
Blueberries 2 lbs. 1.5 lbs. 3 ounces
Rhubarb 2 lbs. 1.25 lbs. 1.5 ounces
Cherry 2 lbs. 1.25 lbs. 3 ounces
Grape 2 lbs. 1.25 lbs. 2 ounces
Apricot 3 lbs. 2.5 lbs. 3.5 ounces
Nectarine 3 lbs. 1.5 lbs. 5 ounces
Q: That’s nice. I still don’t get it. Why all the steps? Also, I’m freaked out that someone is going to get poisoned.
A: Got it. Let me break this down for you.
HOW JAM WORKS.

1. Jam is sanctioned candy. It has sugar in it. Lots of sugar, because sugar will keep you from consuming botulism. You’re welcome. If you want jam with less sugar in it, then make it and store it in the fridge.
2. When you make jam, which, by the way, is not an ancient form of preserving fruit; it’s a little over 100 years old, you are reducing the chances of bad bacteria forming in two ways. First, you’re removing moisture in the fruit. Bacteria loves moisture and thrives in it, but the sugar is attacking the cells walls of the fruit and drawing that moisture out in a process called maceration. Have you ever sprinkled sugar over berries, only to come back a few minutes later to fruit swimming in a pool of juice? Maceration. Second, you’re increasing acidity by adding lemon juice. You notice that pickles last a nice long time even though they’re in a liquid? It’s because the brine that the pickles are floating in is so very acidic (vinegar).
3. Since making jam to preserve the fruit is all about removing moisture (it leaves by evaporating as you’re cooking), then you need a wide, wide pot. Don’t try to double your recipe in a tall pot, because it’s all about a wide surface area. I try to avoid having jam more than 4″ deep in any pot. You also want to make sure your pot is non-reactive, meaning no aluminum or cast iron, unless it is coated with enamel. I just inherited my great-grandmother’s copper canning pot, but I’ve been making jams for years in a Dutch oven I bought at a yard sale.
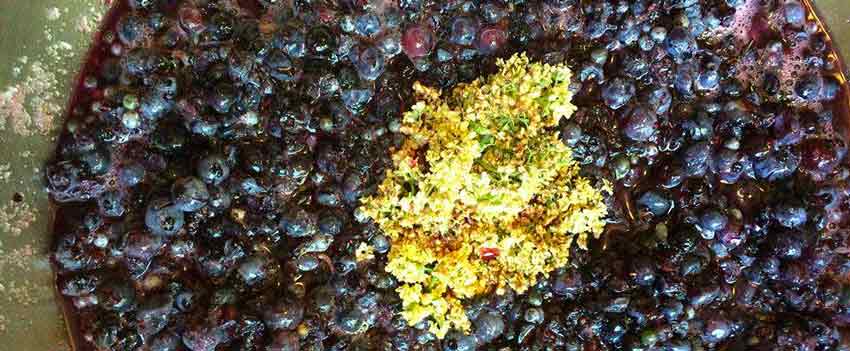
4. So now you’ve got the basics down and you want to get fancy. Make room the fridge! The photo up here is our Blueberry Orange Blossom Jam. I made the picture pretty by putting the blossoms in, but my usual strategy involves making some sort of bag with a flour sack towel or empty tea bag, then filling it with anything from blossoms to dried peppers and sinking that into the bowl or pot filled with the fruit, sugar and lemon juice, stirring once or twice and letting this sit and stew in the fridge overnight, or overday. Advantage? The sugar starts to cook the fruit, so that by the time you get it on the stove the jam will take less time to set. We love Nectarine & Lemon Verbena and Strawberry & Thyme.
5. Jam set is what you’re looking for. All is means is how much moisture you’ve removed from the fruit, which you can tell by grabbing a metal spoon, dipping it into the jam and seeing how fast the jam pours off of it. I wait until the jam is so thick and slow that it forms a pregnant pause of a drop before falling off the spoon.
BLUEBERRY ELDERFLOWER JAM
This recipe can’t be doubled in a 10-12” wide pot. Why? Because jam is made by reducing the amount of water in the fruit in order to prevent bacteria (which loves to grow in moisture) from growing. In order to let moisture evaporate during the cooking process, you need a lot of surface area exposed. If your pan is too full of jamming liquid, the jam will overcook before it thickens and sets.
This recipe will yield you 5 eight ounce jars. Check out our 5 Steps of Canning before you start.
Ingredients
Blueberry (and Elderflower if you want it) Jam
| 2 lbs | 920g | Blueberries |
| 1 1/2 lbs | 300g | Sugar |
| 5 oz | 140g | Fresh lemon juice |
| 1 tbsp | 8g | Fresh elderflowers or orange blossoms (optional) |
Directions
- Place your jars (just the glass part; your new lids should stay face-up on a clean surface) on a cookie sheet lined with a kitchen towel. Put this cookie sheet in a 200 degree oven, turn the heat off and leave until the jam is set. Take your tallest pot- it should be at least 3” taller than your jars- and fill it ¾ of the way with water. Bring this to a simmer, covered. Have a ¼ cup measuring cup ready by dipping it in the simmering water to sanitize it.
- Place rinsed blueberries, sugar and lemon juice in a large, nonreactive pot (that means no aluminum or cast iron that isn’t enameled). Here’s where you choose your adventure! You can cover the pot and let is sit overnight to start macerating* or place it on the stove right away.
If you’re going to add Elderflowers, Orange Blossoms or anything else to infuse your jam, place these in an empty tea bag or a pouch you make out of cheesecloth or floursack towel and twine. Bury this either while the fruit macerates overnight or while you’re cooking it down.
*Why would you leave the jam to sit overnight before cooking it?
Cooking the fruit is done in part with the heat and agitation from the stove, but the sugar and lemon juice play an important part, too. The sugar and lemon are going to start cooking the fruit by drawing the water out of it. By letting this maceration take place in the fridge for 3-12 hours, you’re reducing the total amount of time it will take to cook the fruit over the stove. It’s also the best way to infuse your jam with flowers, spices, etc. - Cook the jam over medium heat, stirring occasionally. If you stir too much at the start of the cooking process, you’ll end up with more broken-up fruit rather than large pieces. If that’s what you’re going for- then go for it with the wooden spoon!
- Once the mixture begins to reduce a little bit, (you will notice that the level of jam shrinks down the pot as is cooks), begin stirring. When stirring, use a wooden spoon and scrape the bottom and sides as you go around. When the mixture begins to bubble, be sure to turn the heat down and continue stirring frequently.
- You can occupy your time by starting to skim the foam off the top with a clean spoon. It won’t make your jam anything but clearer. But it passes the time.
- Let’s test the jam! Have a few metal spoons nearby. Pick up a spoonful of jam and turn the spoon so it is horizontal. If the jam is so thick that is nearly won’t come off the spoon (there should be a pregnant pause here, a drop so thick and viscous it won’t drop off the spoon), you’re then ready to jar it.
- . Take the jars out of your oven. Let them cool for a few minutes. Using the measuring cup (and a sanitized funnel, if you have one), fill the jars with the hot jam just until the jam hits the middle line of the top of the jar. Take a look at your jar: twist until you see all three lines near the top- the middle line is the perfect place to stop filling. Too little jam and you’ll give bacteria a nice amount of oxygen to thrive, and too much jam can cause it to spill over the seal and ruin the processing.
- Immediately place the lids on the jars and twist them fingertip-tight. Using a pair of tongues, carefully lower these in your pot of water. There should be at least 2” of water above the lids of the jars. Turn the heat up, and count 10 minutes from the time it begins to boil (20 minutes if you live at high altitude).
- Remove the jars from the pot and place them back on the towel-lined cookie sheet. Once cooled, you can gently wipe the water off the lids. Store them in your cupboard for up to 6 months. Once opened, these will last a week or two in the fridge.
5 Steps to Easy Canning and Preserving Fruit
- Wash and cut fruit.
- Sanitize jars (leave lids face up on a clean surface).
- Cook fruit until it sets.
- Fill warm jars with hot jam.
- Close the jars and process them in a water bath.